
Train Yourself to Sleep
- Oran Aviv

- Nov 20, 2022
- 9 min read
Updated: Dec 8, 2024
By Oran Aviv,
Senior Reflexology Therapist, Certified Teacher of Naomi Feil's Validation Method

When I began writing about sleep this month, I had no idea how many people, especially those over 50, were having difficulty sleeping. What was going to be one blog on sleep – took on a momentum of it’s own and this is now the fourth blog on the topic. ✅ Sleep Well for Brain Health explains the importance of sleep to keep our brain working well.
✅ Sleep Well Part 1 is about what you can do to prevent insomnia ✅ Sleep Well Part 2 is about how to fall asleep easier During these past weeks as I wrote about sleep, I developed a method to help myself sleep better. I want to share this method with you today.
It combines 2 of the tips I shared in previous sleep blogs 👆🏼: Doing a Body Scan and the Solar Plexus reflex point on the hand. In addition we also add deep breathing.
I had many reasons not to sleep well these past few weeks and this actually gave me the chance to practice and perfect this method. It surprised me how I was able to fall into a deep sleep after being wide awake in the middle of the night.
I also felt that my sleep in general improved.

Don’t Try to Fall Asleep
When you wake up in the middle of the night, or can’t fall asleep, don’t think about the need to fall back asleep. Instead, use the time to allow your body to relax physically and mentally. Sleep is important for our health, our brain, and our well-being, but if we ca’t sleep, we can relax our body physically and clear our mind. By doing this, we will not only give our body a rest, but we will also help our immune system work and improve our brain health. By staying in bed in the dark, we are also reminding our body that it's time to sleep. The nice side effect, is that we will eventually fall into a deep sleep.
This means that if you wake at night avoid: Turning on the lights Making yourself a hot drink
Reading a book or watching a program
If you get up to go to the bathroom, try to keep the light low and return straight to bed.
I can not tell you how long you may be in this “relaxing state” because as I mentioned in the first sleep blog this month, I don’t look at the clock because it may be programming us to wake up each night at the same time.
I may sometimes be in this relaxing state for an hour or more. I have no sense of time. I just continue doing this sleep method and eventually find myself asleep.
I think giving in to just relaxing and not worrying about not sleeping, helped me relax.

Sleep Hand Reflex Point
I explained how to find the solar plexus hand reflex point in the last sleep blog, so if you have been practicing using this point, you can skip this section. I’m rewriting the info again here so you don’t have to go searching for the other sleep blog:
We are going to use the Solar Plexus reflex point on the hand, a great reflex for relaxation.
To find this reflex point, slide down with your finger of your opposite hand between the middle and ring finger - over the fleshy area on your palm. Right under the fleshy area is the Solar Plexus point, marked in red in this photo. (Don't worry there is a film clip too!)
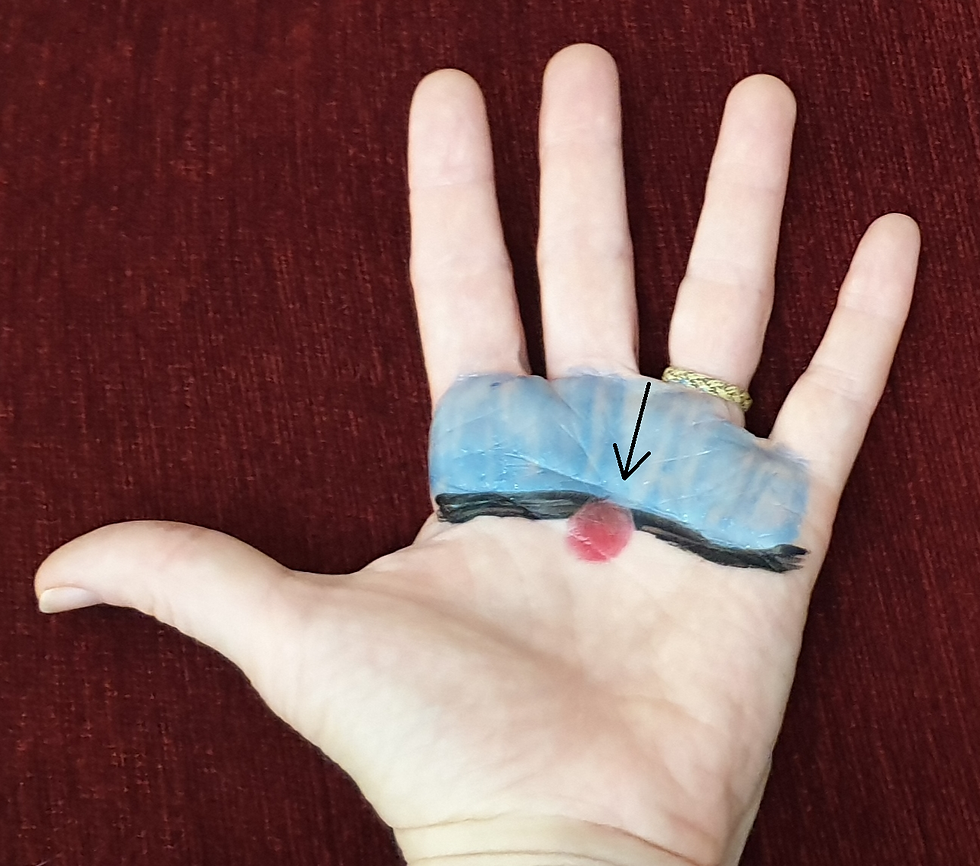
© 2021from Hands-on Dementia for Caregivers
In this video I show at 3:40 how to find the Solar Plexus reflex point on the hand. (The link should take you to this section of the video clip.)
Gently place the thumb of your right hand on the solar plexus point of the left hand. You do not need to press the point, just place your thumb on the reflex.

Hand Placement to Fall Asleep
To hold the Solar Plexus hand reflex point, I find it easiest to lie on my back, place my right thumb on my belly, face up, place my left hand on the thumb, so the Solar Plexus point is on my thumb, and than wrap and lay the rest of my right fingers on my left hand. I like to begin pressing the Solar Plexus of my left hand first, but you can begin with your right hand if that works better for you.

The top photo shows placement on the tummy while sleeping. The bottom photo is a peek to how my thumb is placed on the solar plexus reflex. The left hand lies on he thumb.
I often find that during the night I prefer to sleep on my side. In this case I put one hand, with it's back side on the bed, and the other thumb lies on the hand, palm down.

Here in the photo you can see my hand sticking out of the pillow, but sometimes I sleep with my hands in this position under the pillow. What is important is to find a position that is comfortable or you and that your hands and thumbs are relaxed.
When I want to press on teh solar plexus reflex on the other hand, I also change my sleeping position to the other side.

Cleansing Breaths
After finding the solar plexus point on your hand and placing your hands in a comfortable position while lying down, close your eyes and keep them closed throughout this sleep exercise.
We begin by taking cleansing breaths.
This is a breath to calibrate what state we are in and to help release some of the tension that may be keeping us up.
Breathe in through the nose, and breathe out strongly through the mouth and try to feel any tension leave your body as you breathe out. Try to also focus on the weight of your body after each breath out. Try to feel the heaviness of your body on the mattress.
Take 3 deep cleansing breaths and notice how quickly or slowly you take the breath. This can give you an idea of how tense you may be. We tend to breathe slower when we are more relaxed.
Don’t try to control you breathing by making you breath longer – that will most probably just make you more tense. As you continue with this exercise you may notice a change in your breath length. Just learn to be aware of the length of your breath.
As you get used to doing this sleep exercise, you may want to take a few more cleansing breaths to help make the body heavier. We do the cleaning breaths while keeping our thumb on the Solar Plexus Point.
As you learn to relax with each cleansing breath, you can take a few cleansing breaths during the day for a quick recharge.

Breathe and Scan
With our eyes closed and our thumb on the solar plexus hand point, we now add the body scan that I introduced in last week's blog, together with a breathing exercise. Continue to take regular breaths in and out through your nose and or mouth, whatever is most comfortable for you
Now we breathe in and out and during each breath we are aware of a specific area of our body. There are 10 areas all together. For each area we breath in and out while saying the number or body area silently in our mind.
These are the 10 areas:
#1 Eyes – Feel your eyes are heavy. Feel the weight of your eyes towards the mattress. They don’t need to work now, there is nothing to see.
#2 Jaw – Check if you are clenching your teeth. Let the jaw relax and fall gently. You can also yawn to release this area.
#3 Head – Feel the heaviness of your head on the pillow/bed.
#4 Shoulders– Feel the weight of your shoulders on the mattress. Check if they are up near your ears. I often find that I scrunch up in this area when it is cold. Just let the shoulders fall heavy and gently away from your ears.
#5 Arms - Be aware of your upper arms. Feel their weight on the bed. Then notice the weight of your lower arms and hands and thumbs. As you breathe, feel your hand move.
#6 Chest – Let your breath fill your lungs and feel it raise your rib cage in front. Let the air out and feel that your chest is heavy,
#7 Belly. Breathe into your belly area. When you breathe in, feel your belly get big. Let the area relax as you breathe out.
#8 Back – Breathe in and feel your ribcage extend in your back, then feel the weight of all of your back on the bed as you exhale out.
#9 Hips and upper legs (thighs) - Concentrate on this area as you breathe in and out. Feel the weight of the hips and upper legs on the bed.
#10 Lower legs and feet –Now concentrate on our lower limbs and feel the weight of your feet and legs on the bed
If you feel during the body scan that one or more of the areas are tense, you can breathe and spend more time in that area by adding another breath.
If you are able to go through this whole body scan, with easy, slow breaths and without your thoughts wandering, take one more deep breath in and out and feel that your whole body is heavy on the bed.
Then slowly, if possible with your eyes still closed, switch hands and put your left thumb on the solar plexus of your right hand and repeat the whole exercise again from the eyes. If you feel already very relaxed, you may just want to repeat on the same hand.
If anytime during this exercise, your thoughts wander and you begin thinking of something else, stop and begin the whole exercise again from the eyes, leaving your hands in the same position. If you feel if you are still very tense and far from relaxation, you can do 3 deep cleansing breathes again before the body scan.

Wandering Thoughts
If you are having sleep difficulties, you most probably will have many thoughts and it will seem impossible to get through even half of the body scan.
That is OK. I normally get stuck at #4, the shoulder area and my thoughts take off, sometimes with memories from many years ago.
When you notice that you lost track of the body scan from thoughts, worries or memories that took you away, take a moment to “record” what you thought of. You can notice the thought by mentally imagining a white (or black) board and imagine writing the thought on it.
I want to make this perfectly clear, especially since some people translate this page to their own language, only imagine that you are writing your thoughts down.
Then return to the start of the exercise, beginning from #1 - relax the eyes.
The next time your thoughts wander, mentally write down those thoughts too. I have noticed that often. after I make that mental note, the same thought doesn’t return – yet many other thoughts do. It’s almost like I’m doing Spring Cleaning of my mind.
I often smile when I see where my mind has taken me. Sometimes it’s a memory or emotion from years back, a thought I didn’t even remember. It’s quite amazing what we store in those magnificent brains of ours!
If you notice that your thoughts wander every time you get to a certain area of the body scan, the next time you scan that area, take a few more breaths and stay in that area a bit longer to try to release tension.

Practice & Practice More
This exercise it not a sleeping pill. You are training your body to re-learn how to relax and sleep. This can take time, but the more you practice, the faster you will learn to relax and fall sleep.
As you continue to practice this sleep exercise, you will get to a point that once you put you thumb on your solar plexus, it signals that it is time to sleep. Just waiting for my husband to take the photos of the hand poses for this blog, almost put me to sleep!
As I mentioned, I have no idea how many times I repeated this scan each night, but I was always surprised that I did eventually fall asleep and I slept well. I also began having interesting dreams after falling asleep – which I haven’t had for a long time.
In one interesting dream within a dream, I dreamt there should be a way to take a photo of our dream so we can remember it! Last night I dreamt about how to put a QR code in dreams so we can share them. (Wouldn't that be neat! :-) )
For me, enjoying waking up with a smile from fun dreams is I sign I’m sleeping well. I truly hope the tips I have shared and this method may help you too.
Please do let me know if you have tried the tips or this exercise as well as ask any questions you have by: Posting in our Facebook Group
Writing to me at oran.handsondementia@gmail.com
Wishing everyone a very restful night!😴💤💤💤 ___
Our videos for selfcare and tips for caregivers
Scroll down to sign up for our monthly newsletter to receive notices about our blogs and events.
Please contact us if you would like to arrange a Hands-on Dementia and/or Validation workshop for the staff at your facility: oran.handsondementia@gmail.com
To sign up for our free Webinars: https://www.hands-ondementia.com/webinars
And workshops: https://www.hands-ondementia.com/workshops
Join our new Facebook Group: https://www.facebook.com/groups/288504286193091

Would you like to learn hand reflexology for self-care and to help your family member at your own pace?
You can learn how to use simplified hand reflexology to help and connect with you loved one who is living with dementia and as well as use it for your own self-care.
Hands-On Dementia For Caregivers
A step by step guide to learn 3 reflex points to help your loved one and yourself.
Our ebook includes video clips for self -learning. Get it now while it is still on sale!


Comments